Elegance Colors GNOME Shell Theme Gets A Configuration Tool, New Customization Features

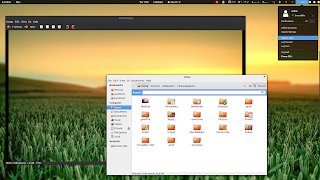
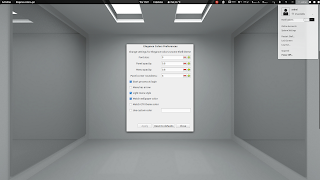
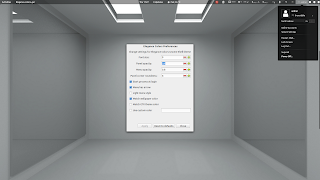
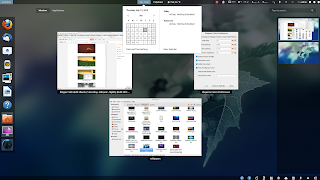
Elegance Colors, a GNOME Shell theme that changes its colors based on the current GTK theme or wallpaper, has been updated today and the theme now includes a GUI that lets you configure the theme, along with some new options.
New customizations supported by Elegance Colors:

  • font size
  • panel opacity
  • menu opacity
  • panel corner roundness
  • enable/disable menu arrrow
  • light/dark menu style
And obviously, the options to match GTK theme color, wallpaper color or to use a custom color are also available in the new GUI configuration tool.


Here are a few screenshots:

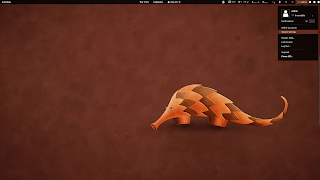
elegance colors gnome shell theme
Match wallpaper color

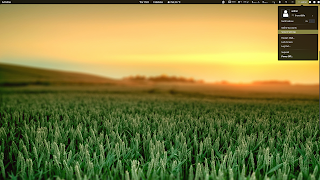
elegance colors gnome shell theme
Match wallpaper color

elegance colors gnome shell theme
Match GTK theme color

elegance colors gnome shell theme
Light menu style, disabled menu arrows

elegance colors gnome shell theme
0.4 panel opacity

elegance colors gnome shell theme
Light menu stile with 1.0 opacity, panel roundness: 0

 Install Elegance Colors


To install Elegance Colors in Ubuntu 12.04, use the commands below:
sudo add-apt-repository ppa:satyajit-happy/themes
sudo apt-get update
sudo apt-get install gnome-shell-theme-elegance-colors gnome-shell-extensions
The last command above will install both Elegance Colors theme and the official GNOME Shell extensions package (if it's not already installed) which includes the User Theme extension, required to be able to change the GNOME Shell theme.
 

How to setting ip on ubuntu server 10.10

How to setting ip on ubuntu server 10.10
Yeah i ve a bit thing with How to setting ip on my ubuntu server 10.10. But after googling and following someone conversations about this cases, i could do solve my bit problem here.

And now i ll share   How to setting ip on ubuntu server 10.10 simply.


Check this out :

1. We need to know what the network interfaces name on ubuntu.
And to see interfaces name, Run this script :
ifconfig -a

eth0      Link encap:Ethernet  HWaddr 18:a9:05:df:62:d6 
          UP BROADCAST MULTICAST  MTU:1500  Metric:1
          RX packets:0 errors:0 dropped:0 overruns:0 frame:0
          TX packets:0 errors:0 dropped:0 overruns:0 carrier:0
          collisions:0 txqueuelen:1000
          RX bytes:0 (0.0 B)  TX bytes:0 (0.0 B)
          Interrupt:17

2. Ok, now we know what is interfaces name and 4 next step edit file /etc/network/interfaces with :
sudo nano /etc/network/interfaces
 We have 2 choice available,

1. We face choice with static IP address :
If U want your Ubuntu has static IP address, you need to add this scripts bellow :

auto eth0
iface eth0 inet static
address 10.1.1.250
netmask 255.255.255.0
gateway 10.1.1.210

2. We face choice IP address with DHCP:
If U want your Ubuntu has dynamic IP address or you make DHCP on your network area, you need to add this scripts bellow :

auto eth0
iface eth0 inet dhcp
3. Do not forget to save the document with Ctl+X and press Y to save the document and then restart network with :
sudo /etc/init.d/networking restart
4. Done! check your ip address with
ifconfig
Sabily (ubuntu islamic edition)

Sabily (ubuntu islamic edition)
Sabily is a free, open source operating system designed by and for Muslims.

It is based on the popular Ubuntu Linux distribution which is a free, efficient and secure operating system. Unlike Microsoft Windows and other proprietary systems, Linux is publicly open and extendible by contributors.


Just like Ubuntu, Sabily includes set of packages that customizes like :
Office,

Internet,

Graphics

and

Video
With Sabily, Muslim users have “out of the box” Islamic software and tools installed as well.
you will find islamic software on default installed of Sabily like
prayer times tool,

Quran study tool,

Hijri calendar

and etc islamic software


Sabily comes with out of the box educational software, codecs for the most used media formats and has better support for Arabic language.

if you might to use Sabily On your computer, you can download the last version  of Sabily here.

Download Sabily


Zekr Qur’an on Ubuntu

Zekr Qur’an on Ubuntu
 Zekr Qur’an on Ubuntu-Zekr Qur'an was made with coding made for Linux, giving it the feel of any other Linux application. It is fully featured with advanced searching, navigation, recitation, and commentary.

How to install Zekr Qur'an on Ubuntu?

1.  Add Zekr Qur'an repository on Ubuntu
sudo gedit /etc/apt/sources.list
2. Select repository appropriate with your Ubuntu version.
these re (Ubuntu Karmic 9.10, Jaunty 9.04, Intrepid 8.10, or Hardy 8.04) available.

karmic :
deb http://ppa.launchpad.net/zekr/ubuntu karmic main
jaunty :
deb http://ppa.launchpad.net/zekr/ubuntu jaunty main
intrepid :
deb http://ppa.launchpad.net/zekr/ubuntu intrepid main
hardy :
deb http://ppa.launchpad.net/zekr/ubuntu hardy main

3. Type and run these commands bellow:
$ sudo apt-key adv --keyserver keyserver.ubuntu.com --recv-keys EF400C7C
$ sudo apt-get update
$ sudo apt-get install zekr ttf-me-quran ttf-sil-scheherazade
$ sudo apt-get install ttf-farsiweb
$ sudo apt-get install flashplugin-nonfree
(optional) this steps for installing  indonesian translation.
$ sudo apt-get install zekr-quran-translation-id-indonesian
if you have any problems on installation process , you can install Zekr Qur'an using manual guide by this link  http://zekr.org/wiki/Installation#Manual_Installation

How to create local repository from .iso file Ubuntu 12.04 LTS

How to create local repository from .iso file Ubuntu 12.04 LTS

How to create local repository from .iso file Ubuntu 12.04 LTS-Recently Ubuntu 12.04 under code name (Precise Pangolin) , that is a bit different with others Ubuntu bellow version.We need a bit configure file to create local repository on this version.

And now i ll show How to create local repository from .iso file Ubuntu 12.04 LTS simply :

1. Download 11th .iso files on kambing.ui.edu/iso
or
You can download here
  1. Repo Ub12.04LTS – 1.iso
  2. Repo Ub12.04LTS – 2.iso
  3. Repo Ub12.04LTS – 3.iso
  4. Repo Ub12.04LTS – 4.iso
  5. Repo Ub12.04LTS – 5.iso
  6. Repo Ub12.04LTS – 6.iso
  7. Repo Ub12.04LTS – 7.iso
  8. Repo Ub12.04LTS – 8.iso
  9. Repo Ub12.04LTS – 9.iso
  10. Repo Ub12.04LTS – 10.iso
  11. Repo Ub12.04LTS – 11.iso
2.We have a problem with looping conf. on  ubuntu. On the default configuration Ubuntu has 8 loops available and we have 11 repo to be mount. So we need a bit configure file group on "/etc/defaults/grub" 


sudo gedit /etc/defaults/grub
 Edit file and add the bolt text bellow. It means Ubuntu ll loop till 24 max loop
GRUB_DEFAULT=0
#GRUB_HIDDEN_TIMEOUT=0
GRUB_HIDDEN_TIMEOUT_QUIET=true
GRUB_TIMEOUT=10
GRUB_DISTRIBUTOR='lsb_release -i -s 2> /dev/null || echo Debian`
GRUB_CMDLINE_LINUX_DEFAULT="quiet splash max_loop=24"
GRUB_CMDLINE_LINUX=""
 Save file>>reboot computer

3. Create mount directory on /mnt/ with type these commands
mkdir -p /mnt/repo1
mkdir -p /mnt/repo2
mkdir -p /mnt/repo3
mkdir -p /mnt/repo4
mkdir -p /mnt/repo5
mkdir -p /mnt/repo6
mkdir -p /mnt/repo7
mkdir -p /mnt/repo8
mkdir -p /mnt/repo9
mkdir -p /mnt/repo10
mkdir -p /mnt/repo11

4.Edit file fstab on "/etc/fstab" and add these scripts bellow
sudo gedit /etc/fstab

#Repository
/media/data2/Linux-Garden/repo12.04/1.iso /mnt/repo1 iso9660 loop,defaults 0 0
/media/data2/Linux-Garden/repo12.04/2.iso /mnt/repo2 iso9660 loop,defaults 0 0
/media/data2/Linux-Garden/repo12.04/3.iso /mnt/repo3 iso9660 loop,defaults 0 0
/media/data2/Linux-Garden/repo12.04/4.iso /mnt/repo4 iso9660 loop,defaults 0 0
/media/data2/Linux-Garden/repo12.04/5.iso /mnt/repo5 iso9660 loop,defaults 0 0
/media/data2/Linux-Garden/repo12.04/6.iso /mnt/repo6 iso9660 loop,defaults 0 0
/media/data2/Linux-Garden/repo12.04/7.iso /mnt/repo7 iso9660 loop,defaults 0 0
/media/data2/Linux-Garden/repo12.04/8.iso /mnt/repo8 iso9660 loop,defaults 0 0
/media/data2/Linux-Garden/repo12.04/9.iso /mnt/repo9 iso9660 loop,defaults 0 0
/media/data2/Linux-Garden/repo12.04/10.iso /mnt/repo10 iso9660 loop,defaults 0 0
/media/data2/Linux-Garden/repo12.04/11.iso /mnt/repo11 iso9660 loop,defaults 0 0
5.Edit file sources.list on "/etc/apt/sources.list" and add these scripts bellow
sudo gedit /etc/apt/sources.list

deb file:///mnt/repo1 precise main multiverse restricted universe
deb file:///mnt/repo2 precise main multiverse universe
deb file:///mnt/repo3 precise main multiverse restricted universe
deb file:///mnt/repo4 precise main multiverse restricted universe
deb file:///mnt/repo5 precise main multiverse restricted universe
deb file:///mnt/repo6 precise main multiverse restricted universe
deb file:///mnt/repo7 precise main multiverse restricted universe
deb file:///mnt/repo8 precise main multiverse restricted universe
deb file:///mnt/repo9 precise main multiverse restricted universe
deb file:///mnt/repo10 precise main multiverse restricted universe
deb file:///mnt/repo11 precise main multiverse partner restricted universe

Ok . . we almost done here. . .
6.Reboot your computer again and Update Ubuntu repository with type this simple command.
sudo apt-get update
:) And you have your own repository on your computer,Now.


How to install filezilla on Ubuntu 9.04

How to install filezilla on Ubuntu 9.04
How to install filezilla on Ubuntu 9.04-FileZilla Client is a fast and reliable cross-platform FTP, FTPS and SFTP client with lots of useful features and an intuitive graphical user interface.

:)

How to install filezilla on Ubuntu 9.04??

You ve 2 ways as possible to install filezilla on Ubuntu 9.04
First, download binary file (.deb file) Filezilla-3-2-6-1-deb.zip

Then open terminal and type the following command :
sudo dpkg -i Filezilla-3-2-6-1-deb
Or if U ve internet connection, You just need type this simple command :
sudo apt-get install filezilla
:) i love Ubuntu!

Good looking thems for Ubuntu 11.04/10.10

Good looking thems for Ubuntu 11.04/10.10
Good looking thems for Ubuntu 11.04/10.10-Xoxox . . . . this weeks i just curious, and love to customize my Ubuntu themes. . . there were a lot of Good looking themes for Ubuntu.

If U do like to try new things on your Ubuntu desktop. . . You may like to install all those Good looking themes for Ubuntu bellow. You just need to (right click on desktop select themes -> customize and begin!).
:) enjoy

Here 10 Best Gnome Themes for Ubuntu

#1 : Elementary Lion

elementary-lion-theme
Download Elementary Lion Theme

#2 : Gotchione Theme

gotchione theme for ubuntu
Download gotchione theme

#3 : Victory Theme

victory-theme for ubuntu
Download Victory Theme

#4 : Equinox Evolution Theme

equinox-evolution-theme
Download Equinox theme

#5 : Aero Clone

aero-clone for ubuntu
Download Aero Clone

#6 : Mac OSX Tiger Theme

os-x-tiger-theme
Download osx tiger theme

#7 : Elegant Brit Theme

elegant-brit-theme
Download Elegant Brit Theme

#8 : Good Choice Theme

good-choice-theme
Download good choice theme

#9 : gekosMac Theme

gekosmac-theme
Download gekosMac Theme

#10 : Mint X Metal Dark

mint-x-metal-dark-theme
Download Mint X Metal Dark Theme

You do not need to be satisfy . . . because there were a lot of Best,Good looking of Ubuntu themes on out there. . . . :P
Come On . . . find them and share to me. . . .

 i love Ubuntu!

UN5 GTK 3.4 Theme for Ubuntu 12.04 LTS Released


UN5 GTK 3.4 Theme for Ubuntu 12.04 LTS Released
UN5 GTK 3.4 Theme for Ubuntu 12.04 LTS Released- Hi .. . . U ubuntu geeks. . .  i love to announce u . . . Ubuntu was released new theme, great,cooler,and simple useful tool bars under GTK3.It calls UN5 GTK 3.4 Theme. I hope this is not the only one the best theme from Ubuntu had released.

UN5 GTK 3.4 Theme for Ubuntu 12.04 is available for down load now.

And for the whole of the features of UN5 GTK 3.4 Theme check this bellow  :


GTK3 – A State of Transition
The Gnome desktop continues to mature in many useful and exciting ways. In this release of UN5 the design returns to a more traditional user experience which aligns with other popular solutions offered by Apple and Google.
Pinched Scroll bars
UN5 introduces the concept of a pinched scroll bar. Instead of highlighting the slider in response to a mouse click, the slider darkens and the width reduces to produce a pinch effect.

Tool Bars
Tool bars are another prominent design element. In this release the tool bars are convex and button highlights sunken. The end result is functional and pleasant.

Desktop Menu
Gnome Shell offers a powerful desktop menu system to ease the selection of applications. The left vertical menu bar is a pick list of application favorites with all available applications icons displayed to the right. A menu to the far right permits the aggregation of applications by category.

Multiple Desktop & Work Spaces
Gnome shell manages your desktop filled with numerous applications as well as multiple work spaces.
 
do not be shy Click here for Installation Instructions :)
i love ubuntu!


Oracle::simple Plsql, looping with cursor :selected table data:

Oracle::simple Plsql, looping with cursor selected table data
Oracle::simple Plsql, looping with cursor selected table data-Hi. . . to day i ll show you, a little bit thing about looping method, with selected table data.

DECLARE
cursor c is
select * from table;
c_rec c%rowtype;
BEGIN
    open c;
    loop
      fetch c into c_rec;
      exit when  c%notfound;

      
      /*Statements */
      /*examle */
      /*insert into table(col_a,col_b)values(c_rec.a,c_rec.b); */

    end loop;

:system.message_level := 5;
commit;
:system.message_level := 0;
END;

How to install driver canon iP 2770 on Ubuntu 9.10

How to install driver canon iP 2770 on Ubuntu9.10
How to install driver canon iP 2770 on Ubuntu9.10-yesterday, i had a little bit thing with this canon iP 2770 on my computer office that was under ubuntu 9.10. Canon iP 2770 was like missing driver and required for driver printer.

and then, i browsed and searched on the forums,googling around and to fix this problem , you just need to install driver Canon iP 2770 and you could use your printer then.

Ok and now i ll show you

How to install driver canon iP 2770 on Ubuntu9.10 :


1. Download Canon ip 2770 Driver Printer on Download via 4shared.com  or Download via mediafire.com
2.Extract the file with login as root and type this command :
tar -zxvf cnijfilter-ip2700series-3.30-1-i386-deb.tar.gz
3. Enter into the folder cnijfilter-ip2700* that was extracted and run  install.sh  file as root too.
./ install.sh
4. Check your printer with Print test page. . .

Note  :
if your printer does not work properly,
1.Go to Printer Configuration 
2.Find ip2770 and delete the driver.
3.Turn off your printer and turn on again
4.Create New Printer>>ip2700>>forword>>till finish.
and then check your printer again